How to update Porkbun Nameservers ?
If you have a website or domain name registered with Porkbun, you may need to update your nameservers at some point. Nameservers are the backbone of the Domain Name System (DNS), which translates domain names into IP addresses so that your website can be accessed by users. In this article, we’ll guide you through the process of updating your Porkbun nameservers.
Why Update Nameservers?
There are several reasons why you might need to update your nameservers. One common reason is if you’re switching web hosts or moving your website to a different server. In this case, you’ll need to update your nameservers to point to the new server. Another reason is if you’re using a content delivery network (CDN) or load balancer to distribute your website across multiple servers. In this case, you’ll need to update your nameservers to point to the CDN or load balancer.
Step-by-Step Guide to Updating Your Porkbun Nameservers
Now that you understand the importance of nameservers and why you might need to update them, let’s walk through the process of updating your Porkbun nameservers.
- Login to your Porkbun account.
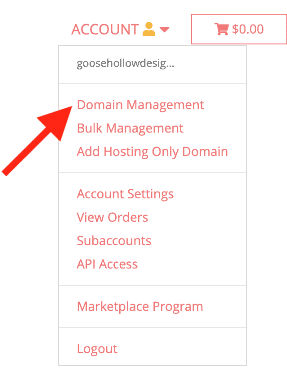
- If you're already logged in, click on ACCOUNT in the top-right corner and select Domain Management.

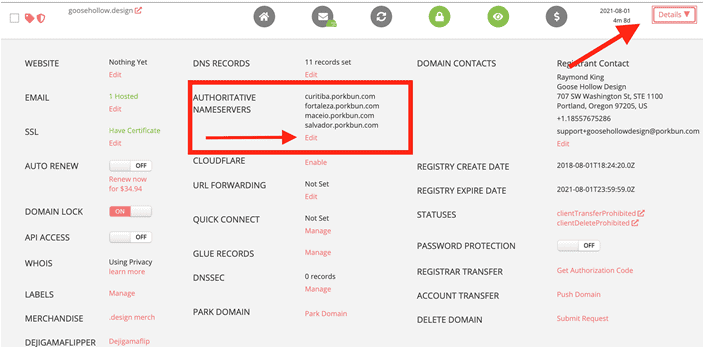
- Locate the domain you wish to update. Click the Details drop-down list to the far right of the domain name.
- Locate the Authoritative Nameservers field. Then select Edit.

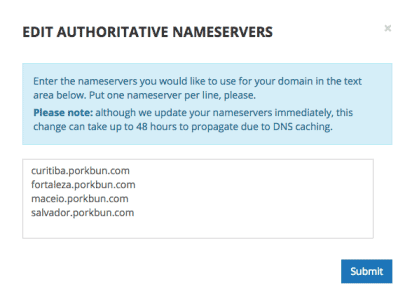
- A pop-up window should appear with your current nameservers. This list specifies which DNS servers will be queried when a user looks up your domain. If you’ve never changed this setting before, the list is pre-populated with Porkbun’s nameservers.

- Remove all of the existing entries. Add the desired nameservers, one per line. Click the Submit button to save your changes.